Update: Arch Home Server with BTRFS RAID 1
Alexander Rüedlinger - - BTRFS , Raid 1 , Arch Linux , Home Server
As I wrote in a previous blog post, I decided to reuse my old workstation computer as an Arch Linux Home Server. So far everything works fine and as expected. Overall, it's a pretty nice home server and development server to play around with virtualization and container technologies such as vagrant and docker. For example, I recently used a FreeBSD vagrant VM to build some FreeBSD images for my Raspberry Pi 3.
However, the old system configuration didn't had enough disk space to store my multimedia files. Since 525GB isn't that much for storing multimedia files, I bought two additional SSD drives, namley two MX300 1050GB SSD drives. I know I could bought a bunch of hard disks with more disk space for the same price, however, I'm not a fan of mechanical hard drives due to their noise. That is why I went for SSD drives.
At the moment, this machine is currently composed of the following old and new hardware components:
- CPU: AMD Phenom II X6 1055T Processor
- Memory: 16GB (4x4) Corsair XMS3 DDR3
- Hard Drives:
- 1x Intel SSD X25-M 80GB
- 2x Crucial SSD MX300 525GB
- 2x Crucial SSD MX300 1050GB
- Mainboard: Asus M4A89GTD PRO/USB3
In this configuration, I decided to use the new SSD drives for a second BTRFS RAID 1 system. Once I installed the new drives into my machine, I started with the following hard drive configuration.
[root@poseidon ~]# lsblk
NAME   MAJ:MIN RM   SIZE RO TYPE MOUNTPOINT
sda      8:0    0  74.5G  0 disk
├─sda1   8:1    0     3M  0 part
├─sda2   8:2    0     8G  0 part [SWAP]
└─sda3   8:3    0  66.5G  0 part /.snapshots
sdb      8:16   0 489.1G  0 disk /media/share/volume1
sdc      8:32   0 489.1G  0 disk
sdd      8:48   0 978.1G  0 disk
sde      8:64   0 978.1G  0 disk
For creating a simple BTRFS RAID 1 system, we only need to format the two drives
using the command mkfs.btrfs -d raid1 -m raid1.
On my system, I used the drives /dev/sdd and /dev/sde to build the new RAID1
system. The other two drives /dev/sdb and /dev/sdc are already in use by a
BTRFS RAID1 system.
As one can see in the following listing, I named the RAID1 system btrfs_volume2
and the formatting process went fine.
[root@poseidon ~]# mkfs.btrfs -L btrfs_volume2 -m raid1 -d raid1 /dev/sdd /dev/sde
btrfs-progs v4.13
See http://btrfs.wiki.kernel.org for more information.

Performing full device TRIM /dev/sdd (978.09GiB) ...
Performing full device TRIM /dev/sde (978.09GiB) ...
Label:              btrfs_volume2
UUID:               315dce55-a166-4da0-9018-96889411e785
Node size:          16384
Sector size:        4096
Filesystem size:    1.91TiB
Block group profiles:
  Data:             RAID1             1.00GiB
  Metadata:         RAID1             1.00GiB
  System:           RAID1             8.00MiB
SSD detected:       yes
Incompat features:  extref, skinny-metadata
Number of devices:  2
Devices:
   ID        SIZE  PATH
    1   978.09GiB  /dev/sdd
    2   978.09GiB  /dev/sde
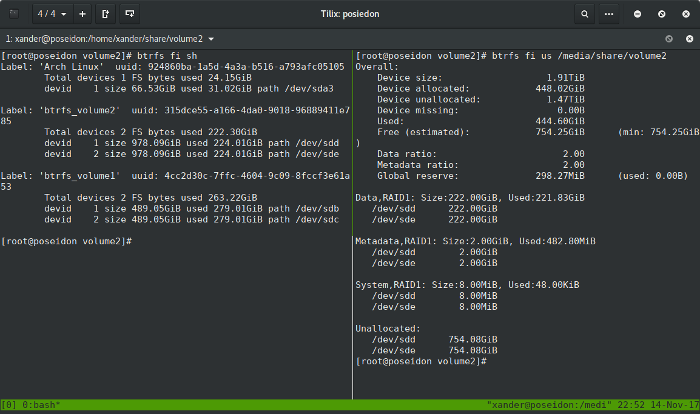
To double check that new BTRFS filesystem was created,
we can run the command btrfs fi sh to get an overview of all the available BTRFS
filesystems on a machine. The output of the command is shown below.
Note that the command is just a shortcut for the command btrfs filesystem show.
[root@poseidon ~]# btrfs fi sh
Label: 'Arch Linux'  uuid: 924860ba-1a5d-4a3a-b516-a793afc05105
    Total devices 1 FS bytes used 24.15GiB
    devid    1 size 66.53GiB used 31.02GiB path /dev/sda3

Label: 'btrfs_volume1'  uuid: 4cc2d30c-7ffc-4604-9c09-8fccf3e61a53
    Total devices 2 FS bytes used 263.22GiB
    devid    1 size 489.05GiB used 279.01GiB path /dev/sdb
    devid    2 size 489.05GiB used 279.01GiB path /dev/sdc

Label: 'btrfs_volume2'  uuid: 315dce55-a166-4da0-9018-96889411e785
    Total devices 2 FS bytes used 112.00KiB
    devid    1 size 978.09GiB used 2.01GiB path /dev/sdd
    devid    2 size 978.09GiB used 2.01GiB path /dev/sde
In order to be able to use the new RAID1 system, we need to mount it. Here, it
doesn't matter if we mount sdd or sde.
In my case, I created the directory /media/share/volume2 to mount /dev/sdd.
Additionally, I used the lzo compression option to save disk space.
In brief, to achieve that, I used the commands below:
mkdir -p /media/share/volume2
mount -o compress=lzo /dev/sdd /media/shareq/volume2
Lastly, we need to update the config file /etc/fstab. Otherwise, our system
won't mount the filesystem on every new boot.
Thankfully, creating or updating the fstab file is very simple on Arch Linux.
In short, we can use the command genfstab to overwrite the old fstab file, as
shown in the following listing. However, you should first backup your current fstab.
genfstab -U / > /etc/fstab
So, that's it. My Arch Home Server features now a second BTRFS RAID1 system :-) and of course my wallet is now lighter too :P.